How to install a 40 series torque converter
The 40 series torque converters are the go-to for 8-18hp Engines such as the predator 301, predator 420, or the honda GX 270 or GX390 and their other clones.
Unfortunately, many people end up installing the 40 series the wrong way, mainly because all the tutorial videos and articles are about the 30 series and people assume that the 40 series are installed the same way.
In fact, the few videos on 40 series install out there can also get you confused. If you do install it the wrong way, you will end up wearing out your belts and losing a lot of power.
So how to do it the right way?
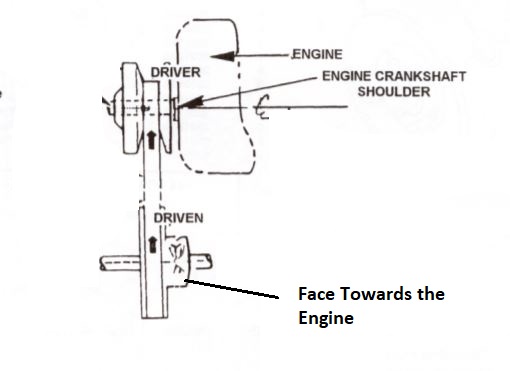
If the movable half of the driven pulley comes with a red spring, the movable half of the driven pulley has to be placed in the opposite direction to the movable half of the driver pulley. Such that the cam of the torque converter is facing towards the engine.
If you want to install the torque converter such that the cam is facing outwards, then you will have to replace the red spring with the yellow spring also called the “reverse springs“.
Here’s the setup diagram from comet 40’s user manual for the red spring.

Similarly in other symmetrical belt systems, torque converters such as the 20 series and the 500 series, all have the cam facing the engine.
Step by Step:
Step 1: Fix your Driven pulley into your jackshaft, if the spring in the driven pulley is red then the cam will face the engine and if the spring is yellow, then the movable parts will both be on the same side (opposite to the engine)
Step 2: Slide some washers into the crankshaft, so that the driver and the driven pulleys can be aligned and also gives some clearance between the engine and the driver pulley.
Step 3: Slide the Driver pulley into the crankshaft, such that the fixed part is facing the engine (look at the diagram above for reference).
If your setup comes with a backplate and you want to install the backplate, then you’ll need to bolt down the middle holes on the plate into the 4 holes on the engine (the holes will be near the crankshaft).
Step 4: Bolt the outer half of the driver into the crankshaft with the bolt and lock and flat washer that comes with the setup. (Recommended torque by Comet is 24-30 ft-lbs)
Step 5: Mount the belt in between the pulleys.
And that’s it, time for you to test out if everything works fine.
If the belt wearing or other problems continues even after proper setup, make sure to use the right-sized belt, have the 2 pulleys perfectly aligned, or get a better torque converter.
