Go Kart Torque Converter Adjustment for more Torque
Who doesn’t likes a good take-off? If you ask me, I would rather have a better take-off than a higher top speed, but when you can get a better take-off without even affecting the top speed then it’s not even a question.
Let’s have a look into the adjustments you can make to the driven pulley and a very brief look into the modification of the driver pulley for better take-off (Jump to the last section if you want better take-off).
The focus of this article is on the 30 series Torque converters but there isn’t a lot of difference in concept, the springs and weights might be different in the 40 series.
Spring on the driven pulley:
Let’s first take a look at different types of springs and the different possible spring settings for the driven pulley and help you choose which option is the best one for you.
(If you’ve already decided on the spring and the setting you want, use the table of content to move to your desired section)
Types of springs:
In the market, there are 3 springs that are mostly used in the 30 series, the Green spring, the red spring, and the yellow spring.
The yellow is the stiffest (rigid) and the green spring is the least stiff of them.
Stiffness:
Yellow Spring> Red Spring> Green Spring
Holes in the Cam of driven pulley:
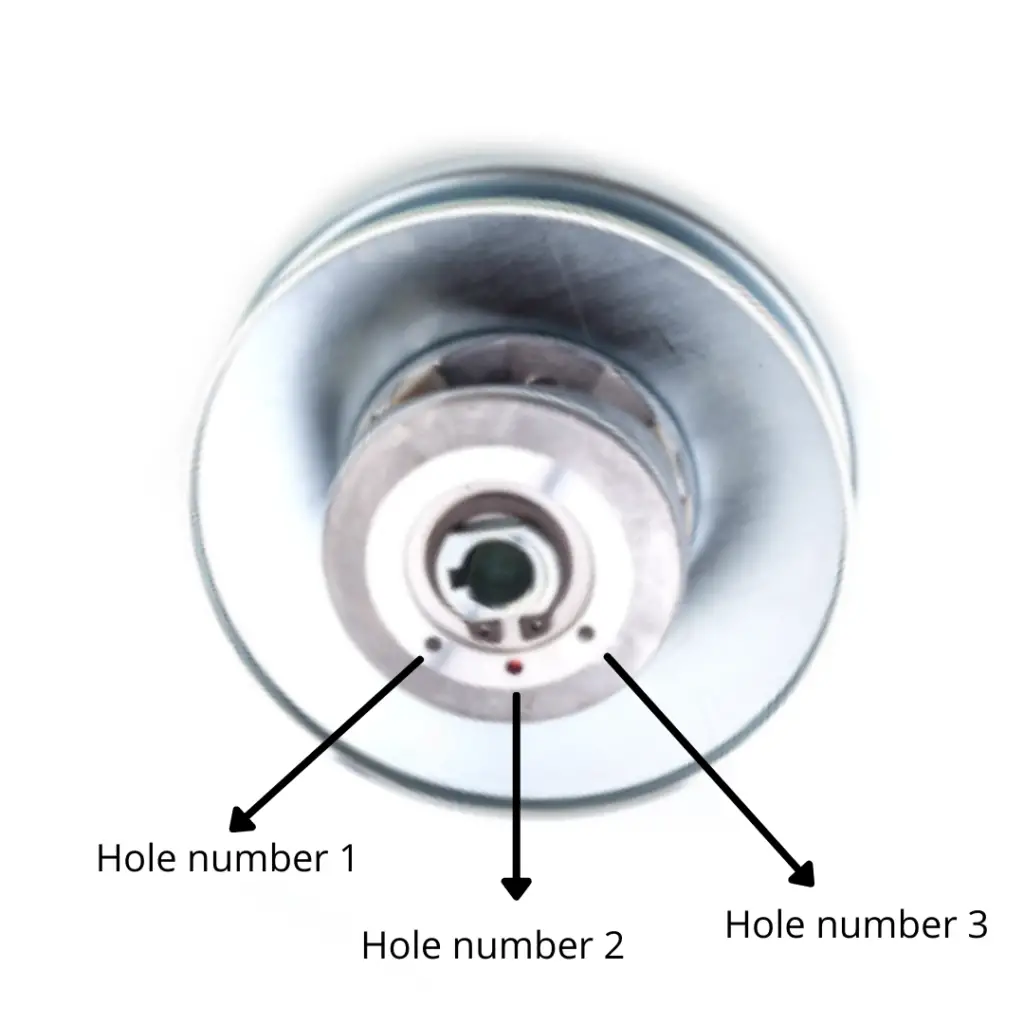
When you take apart your driven pulley in comet 30 or clones, you’ll see 3 different holes in Cam, the cam is the fixed object that remains fixed and keeps the spring from popping off.
There are 3 holes in the cam, it might come labeled as 1,2,3 or it might not. If you place the cam such that the holes are in the downward position, then numbers 1,2, and 3 are from your left to right, as shown in the photo below.

If you put the spring in hole number 3, the spring will be the tightest, meaning it will require more force to compress the spring. Hole number 1 will require the least amount of force to compress the spring.
Which spring and hole is best for your purpose?
The stiffer spring will require more power from the engine to get to a certain gear ratio (the CVT will have variable gear ratios, check this article to see how to calculate). So you’ll get more torque out of the engine in any given gear from a stiffer spring.
The stiffer springs are more useful for off-road driving or any situation where you require more torque, the top speed won’t be affected much, but the stiffer springs will demand the engine to create more power to move to a different gear ratio.
There are 9 combinations of holes and springs, if we are to rate the stiffness on the scale of 1-5 where 5 is the stiffest and 1 is the least stiff combination, then a rough estimation of stiffness is in the table below:
| Hole 1 | Hole 2 | Hole 3 | |
| Green Spring | 1 (least stiff) | 2 | 3 |
| Red Spring | 2 | 3 | 4 |
| Yellow spring | 3 | 4 | 5 (Most stiff) |
If you are interested to learn why and how the springs affect the torque then read the next part or if you have already decided on the spring and the hole, then you can directly read the “how to adjust part”.
Why spring stiffness affects torque:
If you want to get a detailed explanation of how the torque converter works, then check out this guide. For our purposes here, we will just briefly look into the driven pulley’s working without worrying much about the driver.
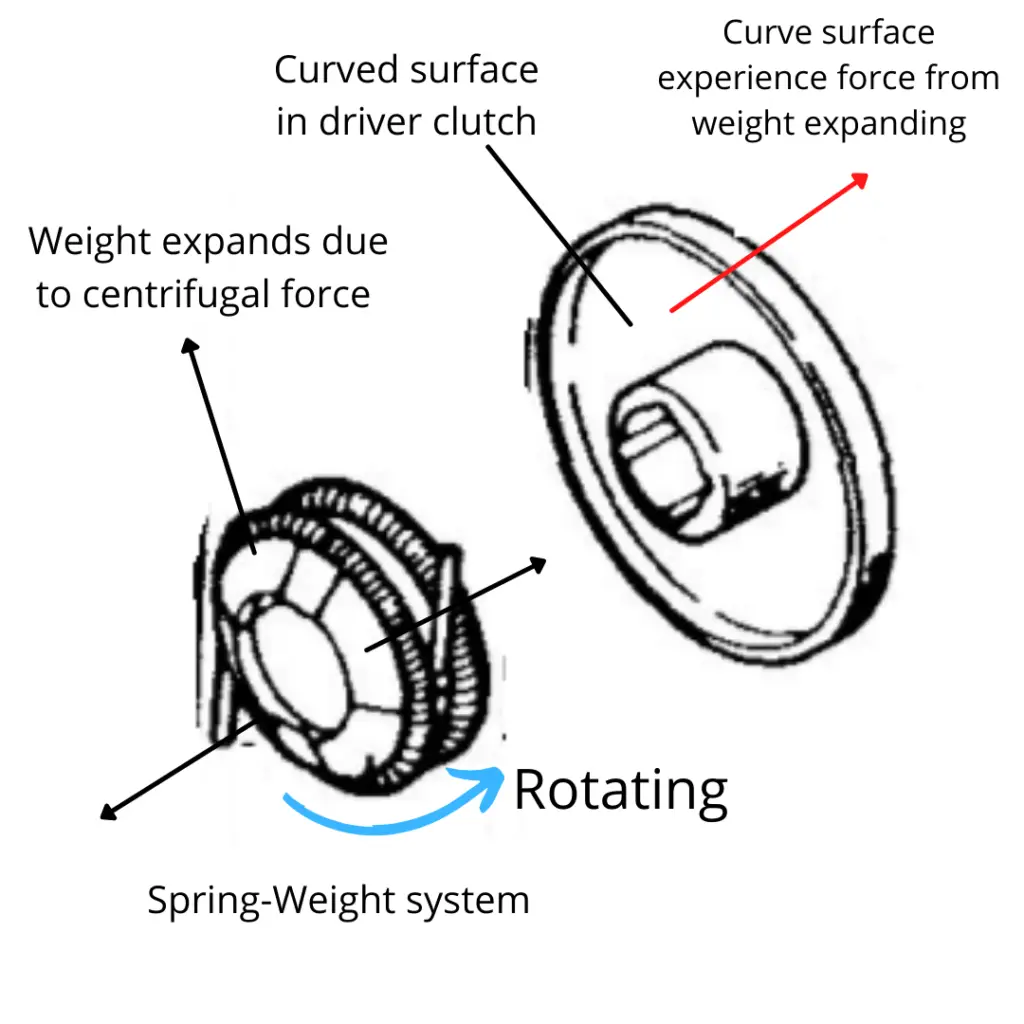
As the rpm of the engine increases, the driver clutch is forced towards the engine due to the centrifugal force of the weight-spring system in the driver clutch.

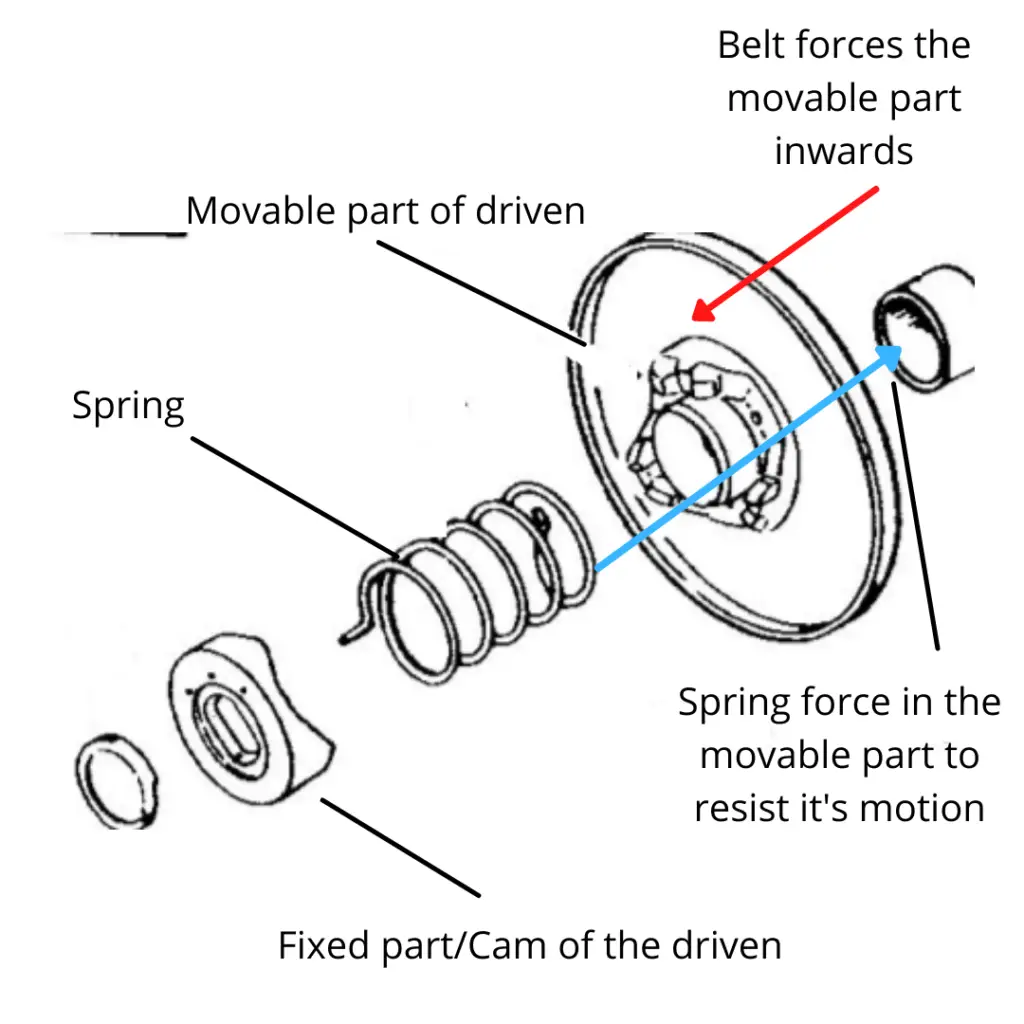
When the clutch moves towards the engine, it pushes the belt upwards, stretching the belt. Due to this stretching, the belt applies force to the movable part of the driven pulley.
The movable part of the driven pulley is connected to the springs.
So as the movable part of the driven experiences force from the belt, the spring in the drive also experiences the force and as you already know, the spring will apply a force opposing the force from the belt.

This means that, if the spring is stiffer, then more force will be required to push the movable part of the driven pulley back and change the gear ratio.
Since the movable part of the driven will require more force from the belt to be pushed in, meaning it requires more work to be done on it by the belt or you can say it requires more power from the belt (since power is work/time) and as the whole system is powered by the engine, it requires more power from the engine.
So the stiffer spring requires more power to shift gear ratios.
Power = Torque x RPM
This means that if you use a stiffer spring, you will get more torque for the same Gear ratio/RPM in comparison to a less stiff spring.
How to adjust the 30 series Torque coverter:
Tools Required:
1 Snap ring plier
1 Spring of your choice
1 Impact wrench or other tools to remove the 5/8 Nut
Step by step:
Step 1: Take the main 5/8 hex nut off the driven pulley system
Step 2: Take your snap ring plier and remove the snap ring, the ring is holding on the fixed cap, once you remove the ring, the fixed part can be taken out (Note: Be careful while taking off the fixed part, the spring might shoot the cap on to you)
Step 3: Take apart the spring and make sure the fixed cam has all the 6 buttons still intact with the Face/movable part of the driven. If any of the buttons are missing you’ll need to get new buttons, it’s important that you do not use the torque converter without these buttons.
Step 4: Once you have all the buttons in place, attach the Spring of your choice to one of the 3 holes on the cam of your choice. (Look back into previous sections if you’re confused)
Step 5: Fix the other side of the spring onto the hole of the movable part of the driven (there is only 1 hole in the movable part).
Now its time to put it all back together
Step 6: If you notice the cam, the cross-section in the middle has 2 flat sides and 2 rounded sides, similarly in the movable part, there are 2 flat and 2 round sides. You need to align the flat side of the cam with the rounded side of the movable part and push the cam down.
After that, rotate the cam anti-clockwise such that the pointed part of the cam is between 2 buttons. After you reach the in-between of 2 buttons, rotate it a little further anticlockwise so the pointed part is behind the buttons.
Step 7: Put back the Snap ring and the Nut.
And you have reassembled the whole thing, so go ahead and test it out!
Modifying the driver pulley:
The essential part of the driver pulley is the weight-spring system in the clutch, the weight-spring system will determine the RPM at which the clutch engages.
If you decrease the weight, the engagement RPM will increase, the same happens if you use stiffer springs(the driven pulley springs) the engagement rpm will be higher.
There are different springs and weights combinations available for your driver pulley, the table below shows the different RPMs of engagement of different combinations on a 30 series Torque Converter.
| Spring color | Zinc Weight (320 gram) | Alum-Die Cast (146.8 grams) | Mod-Alum (90 grams) |
| Black | 1400 rpm | 2100 rpm | 2300 rpm |
| Orange | 1500 | 2300 | 2500 |
| Pink | 1800 | 2800 | 3100 |
| Purple | 2000 | 3200 | 3400 |
| Blue | 2200 | 3300 | 3700 |
| White | 3100 | 4000 | 4500 |
For the 40 series you have fewer options:
| Rollers | Yellow Spring | Red Spring |
| Heavy | 1600 rpm | 2000 rpm |
| Medium | 2200 rpm | 2600 rpm |
| Light | 2400 rpm | 3100 rpm |
So how to get better take-off?
- Find out at what RPM does your Engine makes the most Torque
- Look at the chart above and choose the spring and the weight which engages at the RPM closest to the RPM that produces max torque on your Engine
- Buy the Spring and the weight and swap out the old ones.
